4足歩行ロボットSpotでカラー撮影を可能に
Boston Dynamics社が開発を行った、4足歩行ロボットSpotでカラー画像を撮影できるようになりました。
Spotには5つの魚眼カメラと5つの深度カメラがついています
それぞれ、背面、左右のおなかの部分、顔の左側、右側にあります。
今回は、魚眼カメラのほうにフォーカスを当てていきます。
実行環境
(PC,Spot環境)
- spotソフトウェア – v3.3.0
- Python – 3.7.5
(pythonモジュール環境)
- bosdyn-client – 3.3.0
- bosdyn-mission – 3.3.0
- bosdyn-choreography-client – 3.3.0
カラー画像撮影について
カラー画像撮影について、以下の流れで解説していきます。
1.カメラの名前(image source)の設定
Spotのプログラムにおいて、画像を撮影するためには、カメラの名前(イメージソース)を指定する必要があります。
from bosdyn.client.image import ImageClient
image_client = robot.ensure_client(ImageClient.default_service_name)
sources = image_client.list_image_sources()
print(sources)
上記のプログラムの出力には、image sourceの名前、解像度、画像のタイプ(深度画像か可視画像か)、階調数、保存形式などのSpotのカメラに関する情報が出力されます。
出力される名前のうち、カラー撮影できるものは
[back_fisheye_image, frontleft_fisheye_image, frontright_fisheye_image, left_fisheye_image, right_fisheye_image]
の5つです。
イメージソースを格納しておくには以下のように書いておきます。辞書型の配列にしておくことで管理がしやすくなります。
この場合は、Spotの顔の左右にあるカメラを使用する設定です。
VISUAL_SOURCE = {
    'frontleft_fisheye_image': 'frontleft_fisheye_frame',
    'frontright_fisheye_image': 'frontright_fisheye_frame'
}
カメラの指定ができたところで、Spotにカメラを認識してもらわないといけないので、本当にその名前のカメラがあるのか確かめ、Spotが認識できる型に変更してもらいます。
image_client = robot.ensure_client(ImageClient.default_service_name)
source_list = get_source_list(image_client)

def get_source_list(image_client):
    """Gets a list of image sources and filters based on config dictionary

    Args:
        image_client: Instantiated image client
    """

    # We are using only the visual images with their corresponding depth sensors
    sources = image_client.list_image_sources()
    # print("sources are ", sources)
    source_list = []

    for source in sources:
        # only append if sensor has corresponding depth sensor
        if source.name in VISUAL_SOURCE:
            source_list.append(source.name)
            source_list.append(VISUAL_SOURCE[source.name])

    # print(source_list)
    return source_list
イメージリクエストの設定
カラー画像を撮影するためには、イメージリクエストを作成する必要があります。
イメージリクエストを作成するbuild_image_requestという関数があり、以下のようにimportすることで使用できるようになります
from bosdyn.client.image import ImageClient, build_image_requestbuild_image_request関数には以下のような引数があります
- image_source_name:カメラの名前、上で設定したものになります
- quality_percent:0から100のパーセントで画像の品質を指定することができます。
- image_format:画像の保存形式を指定できます。jpegの場合は”FORMAT_JPEG”で指定できます。(デフォルトはRAW形式です)
- pixel_format:ここでカラー画像を指定することができます。カラー画像の場合は”PIXEL_FORMAT_RGB_U8″で指定ができます(デフォルトは”PIXEL_FORMAT_GRAYSCALE_U8″)
以上の操作をまとめ、コードにで表すと以下のようになります。
操作自体は同じですが、通常処理か非同期処理の違いで使用する関数がget_image関数かget_image_async関数になります。
通常処理の場合
# カラー画像のフォーマットを指定
options.pixel_format = 'PIXEL_FORMAT_RGB_U8'

# 辞書により文字列を変換
pixel_format = pixel_format_string_to_enum(options.pixel_format)

# 画像のリクエストを作成
image_request = [
    build_image_request(source, pixel_format=pixel_format)
    for source in options.image_sources
]

# 非同期処理で画像を取得
image_responses = image_client.get_image(image_request)
非同期処理の場合
# カラー画像のフォーマットを指定
pixel_format = 'PIXEL_FORMAT_RGB_U8'

# 辞書により文字列を変換
correct_pixel_format = pixel_format_string_to_enum(pixel_format)

# 画像のリクエストを作成
image_request = [
    build_image_request(image_source_name=source, pixel_format=correct_pixel_format, image_format="FORMAT_JPEG")
    for source in self.image_sources
]

# 非同期処理で画像を取得
return self._client.get_image_async(image_request)
返り値には画像のバイナリデータが格納されているので、ndarrayの1次元配列に修正をして、imwriteで保存することができます
以下にそのコード例を示します。
for image in image_responses:
num_bytes = 3 # RGB images have 3 bytes per pixel
if image.shot.image.pixel_format != image_pb2.Image.PIXEL_FORMAT_RGB_U8:
raise ValueError("Unexpected pixel format: expected PIXEL_FORMAT_RGB_U8")
dtype = np.uint8
extension = '.jpg'
img = np.frombuffer(image.shot.image.data, dtype=dtype)
if image.shot.image.format == image_pb2.Image.FORMAT_RAW:
try:
# Attempt to reshape array into a RGB rows X cols shape.
img = img.reshape((image.shot.image.rows, image.shot.image.cols, num_bytes))
except ValueError:
# Unable to reshape the image data, trying a regular decode.
img = cv2.imdecode(img, -1)
else:
img = cv2.imdecode(img, -1)
# Save the image from the GetImage request to the current directory with the filename
# matching that of the image source.
image_saved_path = image.source.name
image_saved_path = image_saved_path.replace(
'/', '') # Remove any slashes from the filename the image is saved at locally.
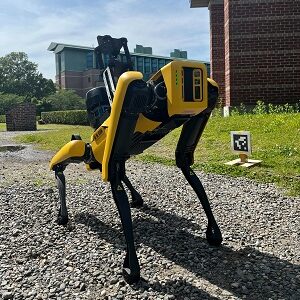
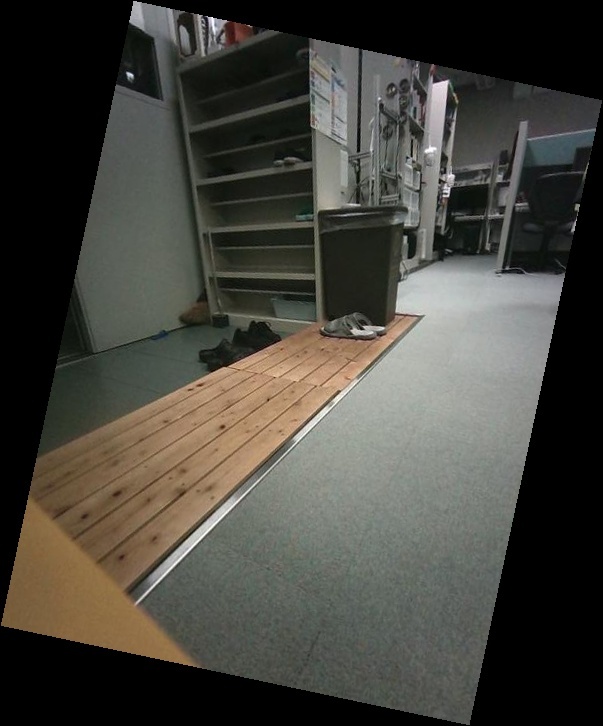
cv2.imwrite(image_saved_path + extension, img)この結果を経て、撮影した画像はこちらになります!


撮影はできましたが、カメラの向きが傾いているので撮影された画像も傾いています。最後に画像の傾きを治す方法を紹介します
カメラのアングルについて
画像の傾きについてはカメラを治すことはできないので、撮影した画像に係数をかけて傾かせるという方法になります。
それぞれの係数はこちらになります
ROTATION_ANGLE = {
    'back_fisheye_image': 0,
    'frontleft_fisheye_image': -78,
    'frontright_fisheye_image': -102,
    'left_fisheye_image': 0,
    'right_fisheye_image': 180
}
ndarrayで配列に直した変数に対して、imwrite関数を使用するまえにrotate関数を使用することで以下のように画像を正しい角度で表示することができます
img = ndimage.rotate(img, ROTATION_ANGLE[image.source.name])
まとめ
ここでは、Spotでカラー画像を取る方法についてご紹介しました!
カメラが下向きについているため、高いところにあるものを撮影できないのが少し難点ですが、別のカメラを搭載するなどの方法で対応していこうと思っています。
このカメラを用いて人間を追跡するプログラムがBoston Dynamics社が提供しているライブラリの中に入っていたのでそちらを動かしたブログも近日中に乗せるつもりです!
ぜひ、ブログのほうをチェックしてお待ちください!